So, I just got an idea... why can't I use it on my PC?
Since it uses internet(Edge/3G) to chat anyway, it is possible to use a PC to do the same thing. Then, I started asking around about how the software works. Seems WhatsApp needs also a mobile phone number to register and as a redundancy when offline. If it's just that.... it's now possible to do.
Requirements:
- A phone (no need to be a smartphone, but it needs to have its mobile number, and be able to receive text)
- A PC (or Mac, whatever)
- Android Emulator (come with Android SDK, downloadable at http://developer.android.com/sdk/index.html)
- WhatsApp for Android apk file (downloadable at http://www.whatsapp.com/download/)
- Telnet or a software applicable to connect to Telnet protocol. (ex. Putty, http://the.earth.li/~sgtatham/putty/latest/x86/putty.exe)
Let's start.
(for those who are familiar with setting up Android Emulator, you can skip to step 6.)
(for those who are familiar with setting up Android Emulator, you can skip to step 6.)
1. Install Android SDK. The default installation path is at "C:\Program Files (x86)\Android" but it seems to have a little trouble after installation because it is difficult to type a path name with " "(space) in between. I recommend to use "C:\Android" for installing path, or use a DOS command "makelink" to create a link from "C:\Android" to the installation path. I won't cover the installation process here.
2. After finish installing, "SDK Manager" program would popup, if not, open it from Start-->All Programs-->Android SDK Tools-->SDK Manager . This tool is for managing which version of Android will be installed in the system. You can choose to install all the Android versions available, but it would be a long time for downloading. I recommend installing only what is needed. For this tutorial, I'll use only Android 2.3.3 API 10.
3. When the SDK Manager finish updating and installing, it's time for setting up our emulator. First off, go to the "Virtual devices" tab on the left, and hit "New..."

New AVD button on SDK Manager
4. On the new emulator window, type emulator name as you want (in this case "TestAndroid"). Set the "Target" and SD card size, then hit Create AVD.
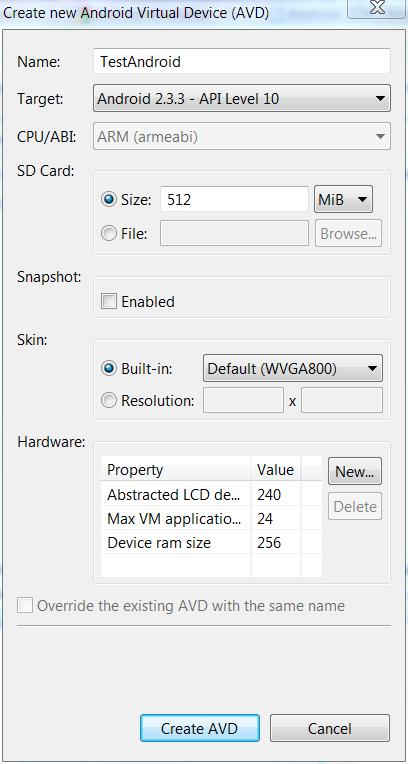
creating Android Virtual Device (AVD/Android emulator)
5. This image shows the Android Virtual Device has been successfully created. Let's click on "Start..." button to start it. (warning, it might take time... it is really slow)

Successful create an AVD, click Start button to start the device
6. When the Android Virtual Device started properly, open the web browser(on the device) and go to www.WhatsApp.com (you can click on Google searchbox and type the URL) and download WhatsApp program and install it.

Download WhatsApp.apk and install it.


8. You have to wait for awhile for the SMS message arrive to your own phone. The message will look like this.
From: 99999
Message:
WhatsApp code 984
Now it is a tricky part to put this message into Android Virtual Device to verify your phone number. (One of my friend didn't do this, he verified by sound instead, which is ok. But mine is cooler XD)
Open a "telnet" or "putty" connection to localhost port 5554

telnet to connect to Localhost port 5554
Fake an SMS message into android virtual device by typing this
sms send <sender phone no.> <message>

Issue a command "sms send <phone no.> <message>"
(* "OK" is an affirmation from AVD)
9. Now it's done.

This tool is supposed to query all the phone contacts in the phone to add in WhatsApp, but too bad that I couldn't create a contact in this device just yet. Anyway, what you can do is waiting for friends to add your phone number and see you online. And it's working!

Yea~~ WhatsApp on Windows 7
UPDATE (11/23/2011):
I saw many people have problems on installing WhatsApp on Emulator. My first thought is I think WhatsApp changed its code to disable us from using their app on Emulator, which is true. I just tried again today and it does not work. The new freshly download file's size is 4.75 MB, but the original file I did while doing this tutorial is just 4.29 MB (version 2.6.7722)
So, what can we do about it? I think from now on, we cannot use WhatsApp on Android emulator anymore. But if you "really" want to try it on the emulator, here is the how-to:
- I uploaded the APK installer (from the time I wrote this tutorial) to here: http://www.mediafire.com/?5d7ehmd4g52cmmg
- Download the file and put it in the folder that easy to remember. (I put it in D:\)
- start the emulator so we can communicate with it via command line
- use command prompt (cmd.exe as in step 8. above) and go to the folder contains "adb.exe" (usually is at C:\Program Files (x86)\Android\android-sdk\platform-tools)
- run command "adb install d:\WhatsApp.apk" (without quotes), where d:\WhatsApp.apk is where the downloaded file is. Then wait until it completed.

- go to the emulator, and perform the steps 6-9 above to install the app normally.

Tidak ada komentar:
Posting Komentar